


viaLink offers a variety of ways to move around in our applications. These are described below.
A set of buttons is located at the top of every window. Because they can be used from any application, we refer to these as “universal” buttons. These neutral “gray” buttons can be used to Upload and Download files, to Log Off, and to access our Screen Help.

A navigation bar is located at the top of each window below the universal buttons. This is in the form of drop-down lists and Go buttons. Use the navigation bar to quickly open another application, such as clearLink, and go to a specific place in an application, such as Request Item Offer Reports in syncLink.
You can navigate by using the menus displayed in each syncLink window, but you should find the Navigation Bar takes less time and fewer clicks when moving around the application.
The navigation bar works from left to right. For example, to move from a clearLink window to the window used to manage your item catalog in syncLink, do the following:
Select syncLink from the left
drop-down list and click Go. The
main syncLink window displays and the center list is populated with the
major areas available in syncLink.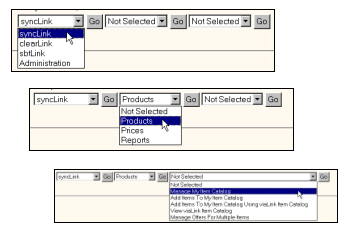
Select Products from the center list and click Go. The right list is populated with the choices in the Products category.
Select Manage My Item Catalog from the right list and click Go. The Supplier Item Search window displays.
Notes:
If you are already in the desired application, such as syncLink, it is not necessary to re-select the application in the left drop-down list.
The applications listed in the left-most list are based on your service agreement with viaLink.
The path displayed at the top of each screen displays the windows used to reach the current location in an application. A colon “:” separates each window name, and the text color of the last item in the path reflects the button color of the application.
You can click a window in the path to jump to that location. This is an alternative to using the back button. For example, you can jump directly from the View Promotion window back to the Provider Selection window.

The navigation bar affects the way the Back button behaves. The Back button will always back out of the window that is currently displayed.

However:
If a normal button-path was followed, such as syncLink / Manage My Item Catalog / Costs / Update, the Back button will return you to the previous window (displaying the Costs button).
If the navigation bar is used to jump to another window, clicking Back will return you to the main window within the “jumped to” application.
For example, if you are in a syncLink window, such as the Supplier Item Search window, and you use the navigation bar to jump to sbtLink / Inventory / Review Shrink. Clicking Back will not return you to the previous syncLink window. Instead, you will move to the main sbtLink window.
The path shown at the top resets when a new application is chosen from the navigation bar.
Important Note: If you enter data in a window, such as Express Data Entry, and click Back or use the navigation bar to go to another window, all unsaved data in that window will be lost. Whenever applicable, save your work before moving to another window.
Many syncLink utilities use a Next Step bar to lead you through the most common tasks.
For example, when you click View Promotions, select a provider, and click View Selected Provider's Promotions, a Next Step bar displays View Promo. You can also use the Next Step bar to View Deals.
The suggested steps on the Next Step bar are intuitive, and you can use the bar's drop-down list to quickly perform all kinds of tasks. If the task displayed on the Next Step bar is not the task you want, simply select another one. If you get stuck, you can always use the Back button to return to a previous window.

Some data tables contain more than one “page.” You can use the “Page” buttons to move through the data, or you can simply enter a page number and click Go To Page. The window will refresh and display the page you entered.

Updated 08/13/2002