top


Add Items to my Item Catalog using Master Items

MillerCoors Distributors - Please use this

This procedure is a quick and easy way to update your catalog using Master Items.  Master items are pre-assigned the correct UPC, pack/inner pack, and other information required by your retailers.  After finding and displaying the item, you simply enter the item number, add your costs, and offer the item to your subscribers (retailers).  

Master items can be "linked" to suppler items, allowing item family and other hierarchical information to be used in transactions and reports.  For more information about Master Items, see About Supplier Items, Master Items, and Item Family Trees.

Please note that when an item is created from a "Master Item" and is linked to SBT, VMP, or other structured processes, Units per Pack, Packs per Case, and other "quantity" attributes cannot be changed.  Restrictions also apply to Product Codes (UPCs).


This procedure uses a Next Step bar at the top with two fields.  You will most often use Save and Proceed.

Save and Proceed

Use the left field to Save your changes, and then Proceed to adding costs and offering the item.  


Proceed

Use the right field to review items, including viewing all UPCs and the item's family.  You can also modify the item before adding.


Follow these steps:

  1. Find and display the item

  2. Enter your Item Order Number.  Review the item if needed.

  3. If applicable, select an MCAT

  4. Validate your entries

  5. Add costs to the item

  6. Enter the cost Effective Date and any retail information

  7. Validate and save your costs

  8. Offer the item to your retailers

  9. If desired, add the next item.


A.

Find and display the item

From the Item & Cost menu:

  1. Click Add Items to my Item Catalog using Master Items.

  2. If an Owner drop-down appears, select the product manufacturer.

  3. Enter search criteria to Find the item(s).  

It's not necessary to enter criteria in all fields.  For most beverage distributors, just searching on Size and Brand will work fine.

Size

    1. Enter the numeric size of the sell unit or each.  For example, enter 12 for a 12 OZ bottle.

    2. Select the size unit-of-measure.  For example, choose Ounce for a 12 OZ bottle.  (Beverage distributors should NOT select Fluid Ounce.)

    3. Optionally select the container using the third field.  For example, Can.  (This can generally be left at Not Selected.)

Note:  Top Items Only displays all items, not just the cases or other top-level items.  We recommend you leave this option checked.

mi_size.gif

Brand (appears for beverage distributors only)

    1. Enter the first few letters of the brand, followed by an asterisk as a wild card.  (The asterisk means you don't have to exactly enter the brand name.)

    2. Click Choices.

    3. Select the brand on the right.

    mi_brand.gif

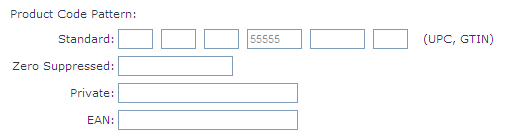
Product Code Pattern

If desired, you can enter a portion of the Standard or Zero Suppressed UPC.

Many suppliers enter just the vendor portion of the UPC in the 4th box, as shown below.  For example 0-71990-55555-1.  You can enter any or all of a UPC.

prod_code_pattern.gif

A field for 8, 13, and 14-digit EANs is also available.


  1. Click Find.  The items that match your entries display.

Hints:  

  • If your search "did not return any objects", try using less search criteria.  For example, change the third Size "container" field back to Not Selected.

  • Top Items Only is selected by default, and should remain checked for most searches.  This lists only items at the very top of the family tree.  For example, a 24-pack of 12 OZ cans is at the top, while the single can is at the bottom.  If this box is checked, the single is not displayed.  Un-check this if you want to list all item levels.


__________________________________________________________

B.


Enter your Item Order Number. Review the item if needed.

Depending on your search criteria, more than one page of items may display.  

  1. Locate the desired item.  Use the Next Page / Last Page or Go to Page links if needed.

  2. Select the item and enter your Item Order Number.

Note:  If desired, you can select an item and use the second field of the Next Step bar to:

  • View Product Codes:  View all UPCs, EANs, and GTINs associated with the item.

  • View Master Item:  View the complete item family.

  • Modify Item Before Adding:  View the item details, modify the Description or other fields, and add retailer-requested information, such as Height and Width.  These steps follow a different path.  Click the link above for the steps to modify then add an item, or click here.

>  When using these options, click Proceed (not Save and Proceed).


__________________________________________________________

C.

If applicable, select an MCAT

A merchandise category ( MCAT) must be selected for the item.  

  1. Scroll down to the merchandise category (MCAT) list.  This is titled Select a category with * for new items.

  2. Select the appropriate MCAT, marked with an asterisk *.

If you do not use MCATs, the * ~~DEFLT~1 category is selected for you.  Go to the next step.

If you do use MCATs:

    1. Select a major category (for example, Beer or Dairy).

    2. Click the Expand link then highlight the level you want for these items.  You must always use the lowest level of an MCAT.  This is identified with an asterisk *.  If an error appears, the lowest level is selected and you can proceed.

__________________________________________________________

D.

Validate your entries

  1. Click Validate to ensure that you have not entered a duplicate item number, and that an MCAT has been selected.

  1. Correct any errors that display.  You are now ready to save the item and add costs.

About Errors:  If you receive the message "You already have an item associated with this Master item," the item or a member of the item’s family is already in your item catalog.  Use Manage My Item Catalog to search for the item.  (You'll have to go to a different set of screens.)

If "You cannot assign an item to a category that is not at the lowest level" displays, select an MCAT marked with an asterisk.  Use the Expand link.


__________________________________________________________

E.

Add costs to the item

Each item must be assigned at least one cost.  

  1. If not already done, select the item you are adding.

  2. Manage Costs & Retails is displayed on the Next Step bar. Click Save and Proceed.

  1. Select the Cost Zones that apply to the cost(s) being added.

Hold the Ctrl key to select more than one zone.  If you only have one zone, it is selected for you.

  1. Optionally, if you are adding retails, select the Retail Zones that apply.

  2. Enter the Base Cost.  This is your cost without any allowance.

  3. If applicable, enter any Allowance off the Base Cost.  (This is not used for promotions or temporary post offs.)

  4. You do not need to enter the Net Cost. The net cost will be calculated when you click Validate.

  5. If desired, enter an optional SRP and SRP Unity Qty.


Cost Zone Notes:

  • Costs and retails are entered by zone.  If one cost applies to all zones, you will use this window once.  If different costs apply to different zones, you will use this window at least twice.

  • At least one regular cost (without an End Date) must be entered for each zone to which the item will be authorized.

  • You can also add future or temporary costs for the new item.


__________________________________________________________

F.

Enter the cost Effective Date and any retail information


  1. The Effective Date is the date the cost will begin, and defaults to the current date. Change this date if needed using the format mm/dd/yyyy or mmddyyyy. This must be today’s date or a future date.

  2. Regular or front-line costs do not use an End Date. Instead, they are replaced by new costs and effective dates. The End Date and New End Date fields are only used for temporary costs. You will normally leave these fields blank.

Important:  Each item must have at least one Regular cost in each cost zone to which it is authorized.  

  1. If desired, select a Cost Comment.

  2. If retail zones were selected, enter the retail information. Otherwise, leave blank.

__________________________________________________________

G.

Validate and save your costs

  1. Click Validate to confirm that your entries are valid (no errors appear).

Use any error messages that display to correct the errors.  Click Validate again and repeat until your data is error free.

  1. Add additional costs or offer the item.

    • If you have different costs for different zones,

      1. Select Return to Master Item Selection from the Next Step bar and click Save and Proceed.

      2. Then select Manage Costs & Retails and click Save and Proceed. Enter the additional costs.

    • If all costs have been entered, leave the Next Step bar at Offer Item and click Save and Proceed.

__________________________________________________________

H.

Offer the item to your retailers

The item and costs are now set up.  The item must next be offered (authorized) to your subscribers (retailers).  

  1. Select the retailers to be offered the new item from the Not Offered Retailers list.   

You can select more than one retailer by holding down the Ctrl key while selecting.

Note:  Some retailers may already be in the Offered Retailers column.  These retailers are set up for "auto offer" and do not require making a selection.

  1. Click the > link to move the selected retailers to the Offered Retailers list.

  2. Return to Master Item Selection is displayed on the Next Step bar.  Click Save and Proceed.


Note:  The Park City Group service agreement between you and your trading partner determines how your subscribers (retailers) are notified.  

In most cases, this takes place behind the scenes and requires no action on your part.


__________________________________________________________

I.

If desired, add the next item

If you have additional items to add, locate the item and enter your Item Order Number.  Follow the steps above.  Otherwise, click Back.

Note:  It is not necessary to re-select the merchandise category (MCAT).  However, you can change it if desired.

__________________________________________________________

(Top)

Updated 9/19/2008